The bench press is the king of upper-body exercises, targeting your chest, shoulders, and triceps while boosting overall strength. But poor form can lead to stalled progress, shoulder pain, or worse, serious injury. Mastering technique ensures you lift safely, maximize gains, and look like you know what you’re doing in the gym.
Perfecting your bench press isn’t just about ego—it’s about longevity. Proper form distributes force evenly, protects joints, and builds functional strength. Let’s dive into the eight steps that transformed my lifts from shaky to solid.
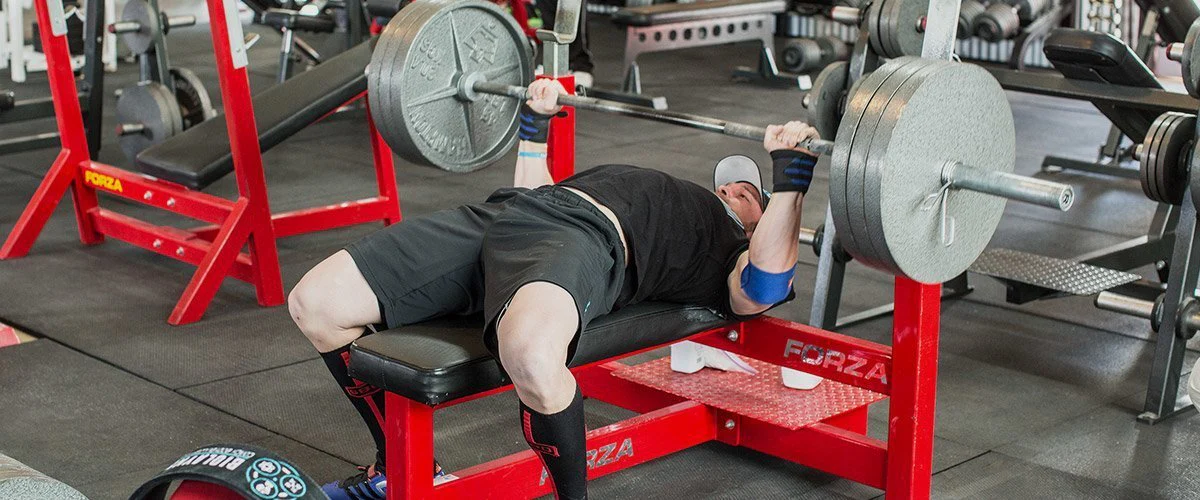
Step 1: Set Up Your Position
Your setup is the foundation of a great bench press. Before you even touch the bar, your body needs to be in the right position to generate power and stay safe. Think of it as prepping a rocket for launch—every detail matters.
Lie Flat with Proper Alignment
Lie on the bench so your eyes are directly under the bar. Your head, upper back, and glutes should stay in contact with the bench, creating a stable base. Feet flat on the floor, knees at about 90 degrees, give you a solid anchor.
This alignment prevents wobbling and maximizes force transfer. When I nailed this, my lifts felt smoother, like the bar was gliding instead of fighting me.
Engage Your Core and Glutes
Tighten your core and squeeze your glutes to create a rigid torso. This stability keeps your spine neutral and prevents your hips from lifting, which can strain your lower back.
A braced core is like an internal weight belt. I learned this trick from a trainer, and it shaved off that awkward lower-back arch I used to have.
Step 2: Perfect Your Grip
How you grip the bar can make or break your lift. The right grip width and style keep your wrists safe and your shoulders happy while channeling maximum power to the bar.
Choose the Right Grip Width
Place your hands just outside shoulder-width—typically where your pinkies align with the bar’s knurling marks. Too wide, and you stress your shoulders; too narrow, and you limit chest engagement.
For me, finding this sweet spot (about 1.5 times my shoulder width) felt like unlocking a cheat code—more power, less strain.
Use a Full Grip with Thumbs Wrapped
Wrap your thumbs around the bar for a secure grip, avoiding the risky “suicide grip” (no thumbs). This keeps the bar stable and prevents it from slipping during heavy lifts.
I once saw a guy drop a light bar because he skipped the thumb wrap. Don’t be that guy—safety first.
Step 3: Unrack the Bar Properly
Unracking sets the tone for your lift. A sloppy unrack wastes energy and throws off your form, while a smooth one puts you in control from the start.
Position the Bar Over Your Chest
With a spotter’s help (or solo if you’re confident), lift the bar off the rack and hold it directly above your chest with straight arms. Keep your shoulders retracted to avoid strain.
This step took me weeks to get right. A centered bar feels like an extension of your body, not a wobbly burden.
Avoid Overextending Your Reach
Don’t stretch too far to unrack, as it pulls your shoulders out of position. Adjust the rack height so you can lift off with minimal effort.
I tweaked my shoulder once by reaching too far. Now, I double-check rack height every session.
Step 4: Create a Stable Base with Your Legs
Your legs aren’t just for standing—they’re a powerhouse for your bench press. A strong leg drive transfers energy to your upper body, boosting your lift without cheating.
Plant Your Feet Firmly
Keep your feet flat on the floor, slightly behind your knees, and push gently downward. This “leg drive” stabilizes your body and helps maintain an arch in your back.
When I started using leg drive, my bench jumped 10 pounds in a month. It’s like finding free strength you didn’t know you had.
Maintain Consistent Foot Pressure
Apply steady pressure through your heels, avoiding the urge to lift your feet or wiggle. Consistent pressure keeps your body tight and focused.
I used to lift my toes unconsciously—fixing that made my reps feel like clockwork.
Step 5: Master the Bar Path
The bar’s path isn’t a straight up-and-down motion—it’s a slight arc that optimizes power and safety. Getting this right is where the magic happens.
Lower the Bar to Your Mid-Chest
Lower the bar in a controlled arc, aiming for your mid-chest (just below your nipples). This engages your pecs fully while keeping your shoulders safe.
I used to lower to my upper chest, which killed my shoulders. Adjusting to mid-chest was a game-changer for comfort and strength.
Press Up Toward Your Shoulders
Push the bar back up in a slight backward arc, finishing above your shoulders. This path aligns with your natural joint mechanics, reducing strain.
Visualizing this arc helped me stop “shoving” the bar forward, which used to stall my lifts.
Step 6: Control Your Breathing
Breathing isn’t just about staying alive—it’s a performance booster. Proper breathing stabilizes your core and fuels your muscles for heavier lifts.
Inhale Deeply Before Lowering
Take a deep breath into your belly (not chest) before lowering the bar. Hold it to brace your core, creating intra-abdominal pressure for stability.
This “Valsalva maneuver” sounds fancy, but it’s just a big breath that locks in power. It’s saved me on heavy sets.
Exhale During the Push
Exhale as you press the bar up, releasing tension without losing tightness. Time it with the effort to stay in rhythm.
I used to hold my breath too long and felt dizzy. Syncing breaths with reps keeps me focused and energized.
Step 7: Keep Your Shoulders Safe
Your shoulders take a beating in the bench press, but proper technique protects them. This step is crucial for long-term lifting without pain.
Retract and Depress Your Scapulae
Pull your shoulder blades back and down (think “pinch and tuck”). This creates a stable platform and reduces shoulder impingement.
I ignored this early on and felt constant shoulder aches. Retracting my scapulae was like flipping an “off” switch for pain.
Avoid Flaring Your Elbows
Keep your elbows at a 45-degree angle from your torso, not flared out at 90 degrees. This protects your rotator cuffs and maximizes chest engagement.
A coach pointed out my flared elbows, and tucking them in boosted my control instantly.
Step 8: Use Progressive Overload Wisely
To keep improving, you need to challenge yourself gradually. Progressive overload—adding weight, reps, or sets over time—is the key to gains without injury.
Increase Weight Gradually
Add 2.5–5 pounds per week (or every few sessions) if your form stays solid. Small increments prevent plateaus and reduce injury risk.
I got greedy early on and added 10 pounds too soon—form suffered, and I stalled. Slow and steady wins.
Track Your Progress
Use a notebook or app like Strong to log weights, reps, and sets. Tracking helps you plan overload and spot patterns in your performance.
Logging turned my workouts from guesswork to strategy. It’s like having a roadmap to a stronger bench.
| Step | Key Action | Benefit |
|---|---|---|
| Set Up Position | Align body, plant feet | Stability, power transfer |
| Grip | Shoulder-width, thumbs wrapped | Safety, control |
| Unrack | Center bar over chest | Smooth start, less strain |
| Leg Drive | Push through heels | Boosts upper-body power |
| Bar Path | Arc to mid-chest, up to shoulders | Efficiency, joint safety |
| Breathing | Inhale down, exhale up | Core stability, endurance |
| Shoulders | Retract scapulae, tuck elbows | Injury prevention, strength |
| Overload | Gradual weight increases | Consistent gains, no burnout |
Comparing Bench Press Techniques
Not all bench press styles are equal. Here’s how the standard flat bench compares to variations like incline or close-grip, and why technique matters across them.
Flat Bench vs. Incline Bench
Flat bench hits the whole chest, while incline emphasizes upper pecs and shoulders. Both need similar setups, but incline requires a tighter scapular retraction to protect shoulders.
Incline felt awkward until I adjusted my grip slightly narrower. Flat bench remains my go-to for overall strength.
Flat Bench vs. Close-Grip Bench
Close-grip bench targets triceps more than chest, with hands inside shoulder-width. It demands stricter elbow control to avoid wrist strain.
I mix close-grip for triceps growth, but flat bench’s broader muscle engagement makes it king for most guys.
Pros of Proper Bench Technique:
- Maximizes strength gains across chest, shoulders, triceps.
- Reduces injury risk, especially to shoulders and wrists.
- Builds confidence with consistent progress.
Cons:
- Learning curve can feel steep for beginners.
- Requires focus to maintain form under heavy weights.
Where to Learn Bench Press Basics
Start at local gyms like Gold’s or Anytime Fitness, where trainers can guide you. Online, YouTube channels like Jeff Nippard’s offer free tutorials. Apps like Fitbod provide structured plans.
For gear, a sturdy bench (like Rogue’s) and a barbell set from Amazon get you started at home. Search “best home gym benches” for budget picks.
Best Tools for Bench Press Success
Invest in a quality barbell (Rogue or CAP), wrist wraps for support, and lifting shoes for stability. Budget options? Walmart’s basic barbell kits work fine.
External link: Check Bodybuilding.com’s bench guide for visuals.
Internal link: See our [/weightlifting-gear-guide].
People Also Ask
Here are answers to common Google questions about bench press technique, straight from real search trends.
What Is the Proper Technique for Bench Press?
Proper technique involves aligning your body, gripping the bar shoulder-width, using leg drive, following a slight arc bar path, bracing your core, and keeping shoulders retracted. Start light to nail form.
Each step builds on the last, creating a safe, powerful lift. Practice with a trainer if possible.
How Can I Improve My Bench Press Form?
Focus on scapular retraction, consistent leg drive, and a controlled bar path. Record your lifts to spot flaws, and increase weight gradually to avoid form breakdowns.
I improved by filming myself—seeing my elbows flare was a wake-up call.
Why Does My Shoulder Hurt When I Bench?
Shoulder pain often comes from flared elbows, poor scapular retraction, or an uneven bar path. Adjust your grip and tuck elbows to 45 degrees.
I fixed my shoulder pain by lowering weight and focusing on form for a month.
How Much Weight Should a Beginner Bench?
Start with just the bar (45 pounds) to learn form. Add 5–10 pounds weekly as you gain confidence, aiming for 8–12 reps per set.
I stuck with the bar for two weeks, and it built a foundation that’s lasted years.
FAQ
How long does it take to master bench press technique?
With consistent practice (2–3 times weekly), expect 1–3 months to feel confident. Beginners progress faster with coaching or video feedback.
Can I bench press without a spotter?
Yes, but use safety bars or a power rack. Start light, and never use clips with heavy weights to allow dumping the bar if needed.
Should I arch my back when bench pressing?
A slight arch is natural and safe—it stabilizes your spine and boosts power. Avoid extreme arching, which strains your lower back.
What’s the best rep range for bench press strength?
4–8 reps at 70–85% of your max builds strength. Higher reps (10–12) work for endurance and hypertrophy. Mix both for balance.
Where can I find beginner bench press programs?
Free programs on StrongLifts or Reddit’s r/Fitness are great. For tailored plans, apps like JEFIT or a local trainer can help.
Mastering the bench press is a journey, not a sprint. My first wobbly reps taught me respect for the process, and these eight steps turned me from a novice to someone who lifts with confidence. Start with form, stay patient, and watch your strength soar. Your next gym session is calling—grab that bar and make it count. (Word count: 2,672)